In this in-depth tutorial, you will learn how to create a custom loop to suit your specific requirements. The comprehensive instructions combined with highlighted screenshots will offer the required direction needed to follow with ease the task of creating the loop and validating it. The custom Loop interaction put to use in this tutorial serves as a resource to showcase the step-by-step process involved in retrieving the list of available fruits at a store along with their purchase price one by one.
Prerequisites
- VOGO Voice account: https://www.vogovoice.com/
- Access rights to the Interactions section.
- Access rights to the Interaction builder platform.
Create a Custom Intent
Make a suitable intent to be invoked in order to execute a custom loop interaction mapped to it.
Create an intent titled ‘Custom Loop’ with a suitable sample utterance linked to it. The sample utterance for this intent would be: “Show me available stock”. This sample utterance will serve the purpose of fetching the list of fruits available at the store along with its individual purchase price.

To learn about how to create a custom intent, visit Creating Intents
Steps to create an interaction flow
- Log into your VOGO Voice account to be directed to VOGO Voice Management Console (https://account.vogovoice.com)
- Navigate to Interactions on the vertical bar displayed on the left-hand side of the Dashboard.
Dashboard > Interactions

3. Now, click on the Interactions button at the bottom right-hand corner of the screen. Select the ‘Custom Loop’ intent to be directed onto the Interaction builder platform.

4. In the flow diagram area, you will be able to see the Start and Response components.
5. Unlink the Start component from the Response card by clicking the delete icon placed in the middle of the chain.

6. Now, drag and drop an Add Variables component onto the flow diagram area and connect it to the Start Component.

7. Now mouse over the top right corner of the Add Variables component. Click on the pencil icon that appears. This will open up its configuration window.

8. Configure the Add Variables component by adding the key-value pairs as shown in the screenshot below. Fill in the first variable name as items and add the value, the format of which is provided below in detail. Then, set the datatype as Object.
🖍 Note: The input value for the items variable includes the list of items along with their individual purchase price and availability.

items:

[
{
"id": 1,
"name": "Apple",
"available": true,
"price": 5
},
{
"id": 2,
"name": "Avocado",
"available": false,
"price": 5
},
{
"id": 3,
"name": "Cherry",
"available": true,
"price": 6
},
{
"id": 4,
"name": "Blackberry",
"available": true,
"price": 2
},
{
"id": 5,
"name": "Dragonfruit",
"available": false,
"price": 8
},
{
"id": 6,
"name": "Strawberry",
"available": false,
"price": 3
},
{
"id": 7,
"name": "Banana",
"available": true,
"price": 1
}
]
9. Now drag and drop a Check Variable component onto the flow canvas and connect it to the already configured Add Variables card.

10. Next, mouse over the top right corner of the Check Variable component. Click on the pencil icon that appears. This will open up its configuration window.

11. Configure the Check Variable component with a test condition using the relational operator “is greater than”. The purpose of configuring this card is to check if there are any values in var.items. The flow for the existing user will proceed from Then if the length of the var.items is greater than 0 or else from Otherwise.
12. Populate the left and right-hand sides of the Configuration window as in the screenshot shown below. Set the data type based on the input.

Left-Hand side: var.items.length (choose data type as Path).
Right-Hand side: 0 (choose data type as Number)
To learn about different template engines to be followed to run functions visit https://university.vogovoice.com/kb/template-engine/
13. Next, drag and drop another Add Variables component onto the flow canvas. Now connect the Then anchor of the Check variable to the Add Variables card.

14. Configure the Add Variables component by adding a new function. To serve this purpose, navigate to the Data tab adjacent to the Components on the top left-hand side of the interaction builder platform.
15. Click on the Data part and in the search bar type pull to bring up the list of relevant functions. From the drop-down that appears, select the pullAt function.

16. Drag and drop the pullAt function in the value field of the recently attached Add Variables component. This will automatically generate the pullAt function in the respective field. Here, name the variable as item. Therefore, in the variable item, we are making use of the pullAt function to pick the first element from the variable items.

17. To add the first and second arguments click the plus button that appears under the heading Arguments. The first of the two Arguments is var.items which represent the path for accessing the objects. For the second one input the number 0. Set the data type as Path and Number respectively. This is done in order to select the first element. The screenshot right above presents both Arguments distinctly.

18. Drag and drop a Response component and connect it to the Otherwise path of the previously configured Check Variable component. The newly added Response component is to be configured at a later part of the interaction flow.

19. Next, drag and drop another Check Variable component to the flow and connect it with the lastly added Add Variables component.

20. Now configure the newly added Check Variable component with a test condition using the relational operator “is equal to”. The purpose of configuring this card is to check the availability of the fruit. To serve this purpose the path var.item.0.available contains a boolean value. If the resultant value is true, then the flow for the existing user will proceed from the Then path or else from Otherwise. Populate the left and right-hand sides of the Configuration window as in the screenshot shown below. Set the data type based on the input.
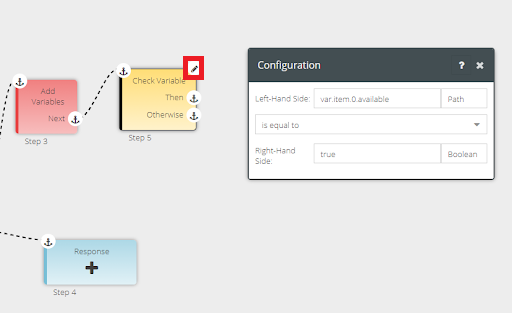
Left-Hand side: var.item.0.available (choose data type as Path).
Right-Hand side: 0 (choose data type as Boolean)
21. Connect the Otherwise path to the first Check Variable component that was added in this interaction flow. Doing so will repeat the cycle till a fruit is available.

22. Drag and drop another Check Variable component. Connect this Check Variable with the Then path of the previous Check Variable card.

23. Configure the newly added Check Variable component with a test condition using the relational operator “is equal to”. The purpose of configuring this card is to check the length of the items again to see whether the available fruit is the last one on the list or if there are more. So, if the length is equal to 0 (i.e. if there are no more items) then the flow should be redirected to the Then path which is to be connected to the first Response component that was placed earlier as shown in the image below.

24. Ensure to populate the left and right-hand sides of the Configuration window as in the screenshot shown below. Set the data type based on the input.

Left-Hand side: var.items.length (choose data type as Path).
Right-Hand side: 0 (choose data type as Number)
25. Next, configure the Response component as shown below. Clicking on the Voice icon on the top-right hand side of the component opens a Speak pop-up window with a field titled Say wherein you need to curate the template. The first part is for checking the length of var.items which is the main Object we pull the data from. Then we need to check if var.item exists. If the length is 0 and var.item exists, then the value in var.item suggests the final one (or last item in the list). The third part is to check if the fruit in the var.item is available because there is a chance to pass an unavailable fruit if the last item in the list is not available. So if it is available, then it should present the values to conclude the session that is {{var.item.0.name}} is available for {{var.item.0.price}} for {{pluralize var.item.0.price ‘dollar’}}.
Say: {{#if var.items.length '=' 0}}
{{#if var.item}}
{{#if var.item.0.available '=' true}}
{{var.item.0.name}} is available for {{var.item.0.price}} {{pluralize var.item.0.price 'dollar'}}. Thats all I found.
{{else}}
Thats all I found.
{{/if}}
{{/if}}
{{/if}}
Thank you for using Stock Check voice app.

👍Note: Here, var.item.0.name is the path that will give the name of the fruit, and var.item.0.price will give its price. The template {{pluralize var.item.0.price ‘dollar’}} will pluralise the word dollar. To conclude you may customize using a similar message: That’s all I found combined with a thank you note to conclude the session. If var.item.0.available is false, then it will directly give the voice message “That’s all I found” along with the thank you note.
To add a display message in a display voice-assisted device.
- Click on the Computer icon, and type in the field titled Display Message of the Show pop-up window. The Display message is same as the Say part but with the following change i.e. {{var.item.0.name}} is available for ${{var.item.0.price}} where the $ symbol is to be displayed in place of the word “dollar”.
- Populate the required fields and click the Save button.
Title: Optional
Display Message: {{#if var.items.length '=' 0}}
{{#if var.item}}
{{#if var.item.0.available '=' true}}
{{var.item.0.name}} is available for $ {{var.item.0.price}}.
That's all I found.
{{else}}
That's all I found.
{{/if}}
{{/if}}
{{/if}}
Thank you for using Stock Check voice app.

For further reference on how to populate the additional fields visit https://university.vogovoice.com/kb/guide-response-component/
26. Drag and drop a Response component and connect it to the Check Variable card added in Step 19. Ensure to connect it to the Check Variable component’s Otherwise part.

27. Configure the Response component as shown below. Clicking on the Voice icon on the top-right hand side of the component opens a Speak pop-up window with a field titled Say wherein you need to type {{var.item.0.name}} is available for {{var.item.0.price}} {{pluralize var.item.0.price ‘dollar’}}. As mentioned in the previous response card, var.item.0.name is the path which gives the name of the fruit and var.item.0.price will give the price if it. The template {{pluralize var.item.0.price ‘dollar’}} will pluralise the word dollar. Next, populate the Expect Response field.
Prompt: Say next.
The same message will be replicated in the Reprompt field.
Reprompt: Say next.
🖍Note: The purpose of calling the prompt and reprompt is to route the user to get the price details of the next available fruit.

To add a display message in a display voice-assisted device.
- Click on the Computer icon, and type in the field titled Display Message of the Show pop-up window. The Display message is the same as the Say part but with the following change i.e.$ symbol replacing the word “dollar” in the display.
- Populate the required fields and click the Save button.
Title: Optional
Display Message: {{var.item.0.name}} is available for $ {{var.item.0.price}}

28. Connect the Next anchor of the Response component to the first Check Variable component which will repeat the cycle to present the details of the next available fruit. The screenshot below captures the aforementioned interaction flow.

Testing and Validation
- Click on the Test button next to the Flow Editor button on the interaction builder platform.

2. In the Tests pop-up window that appears, click the + button on its top right-hand corner.

3. Fill in the Name field of the Test Response window that shows up. In the Conversation section of the Test Response, the Custom Loop intent through which this interaction flow has been initiated will be auto-generated in the User invokes field as shown below.
4. Click the + button within the Conversation Section to open up an additional field titled User Invokes. Ensure to populate this field by selecting the Next intent called to action within the interaction flow. Make sure to repeat this step 3 times.

5. After selecting three Next intents from the dropdown list, click Save to perform the test.

6. To validate the Test Response, click on the lightning symbol on the left-hand side of the test case.
7. On the resultant Test Response window, the blue chat bubbles cumulatively present the text within the Response components. Clicking on any of the blue bubbles will show up the related display messages on its right-hand side.

8. The test response in the screenshot below shows the Response component which prompts the user for next because there are more values to show.

9. The screenshot below presents the part of the template in the Response component that gives details of the last available fruit in the list and ends the session with a thank you note.

Congratulations! You have successfully learned how to create a custom loop to retrieve the list of available fruits at a store along with their individual purchase price.
👍 Note: To test the functioning of the interactions on your device you have to deploy the custom skill to facilitate the skill with the new edits. To accomplish this, click on the Deploy button seen at the bottom of the Skill Settings pop-up window.
To know how to deploy a custom skill visit https://university.vogovoice.com/kb/deploying-a-skill/
To learn about Check Variables, click here.