Components form the key identifiable parts of the interaction builder platform. The assembly of the series of components implements the input and logical conditions the user experiences throughout a conversation. Request Permissions is one of the many components used in the flow within the interaction builder platform. The blue color assigned to the Request Permissions component suggests that it is a response card used to generate responses within a session of the skill through the device in voice, display, audio or video format.
This user-centric guide outlines the purpose of configuring Request Permissions component in an interaction flow thereby highlighting its core functionality. To help you get started, the comprehensive guide, on the whole, defines when to use the said component in addition to its relevance within an active session of a skill.
Prerequisites
- VOGO Voice account: https://www.vogovoice.com/
- Access rights to the Interaction builder platform.
How to access the ‘Request Permissions’ component
Navigate to the interaction builder platform of VOGO Voice to access the Request Permissions under the Components section. Click and drag the component onto the flow canvas.
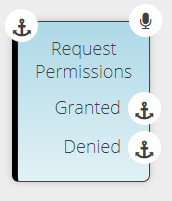
Click the Voice icon on the top right-hand side of the component card to add the suitable prompts/responses to be made through the device in order to request permissions from the end-user.
Purpose of ‘Request Permissions’ Component
Request permissions component when put to use facilitates the skill to request the appropriate permissions to be granted by the end-user for the functioning of the custom skill. Some custom skills will have areas of functionality with restricted access designed for personalized user experience which is active only when the skill is granted access to sensitive user information. This response card prompts the user with a voice message to grant access to his/her profile information or personalized data if they have not approved the request while enabling the custom skill.
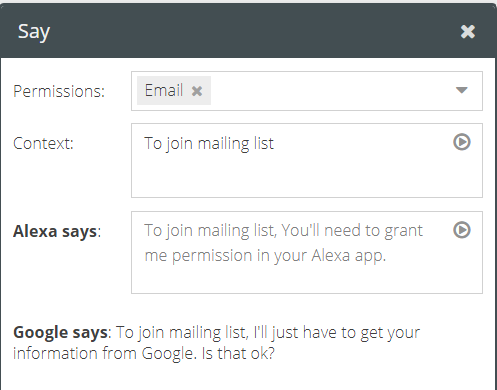
The Say window of Request Permissions component has a field titled Permissions where the drop-down list allows you to select a set of permissions for which the skill has to request access from the end-users. Multiple permission sets can be enabled simultaneously depending on the requirements of the skill. The list of permissions includes Device Address, Email, Mobile Number, Name, Geolocation, and Notification.
Context: This field enables you to provide an explanation to the users through a voice message as to why the skill needs certain permission before requesting access to private information. In some circumstances, the user may continuously try to use a functionality that requires permission despite denying the permission requests. This probably means that the user does not understand why the skill needs permission to provide that functionality. Adding a relevant context provides clarity and prevents users from denying significant permission requests.
Alexa says: As the name suggests, it denotes the voice message spoken by Alexa to the user in regard to requesting permission on behalf of the custom skill. The voice message typed in Context will be replicated in the Alexa says field along with the default statement “You will need to grant me permission in your Alexa app”. The Skill designer has the provision to retain or edit the default statement. The same applies to Google says, but the phrasing of the default statement is subject to vary.
The private data accessed through the Request Permissions component is used to support personalized intents to enhance customer experience without account linking. The skill sends a Permission card to the Alexa app through which the user is prompted to grant the required permissions. The consequent pathing in an interaction flow is relatively dependent on whether the user has Granted or Denied request permissions. So if the user approves the permission, the resultant response in the interaction flow will be chained to Granted whereas if he does not consent, the user will be routed to the subsequent interaction flow linked to Denied.