Components form the key identifiable parts of the interaction builder platform. The assembly of the series of components implements the input and logical conditions the user experiences throughout a conversation. Loop is one of many components used in the flow within the interaction builder platform. The blue color assigned to the Loop card suggests that it is a response card that is often used for responding via voice, display, audio, or video within a custom skill.
This user-centric guide helps you familiarize yourself with the asynchronous function of the Loop response card and its processing of input information in relation to a specific intent on which the interaction flow is modeled. To help you get started, the comprehensive guide, on the whole, focuses on the process of the component in addition to its relevance within the active session of a skill.
Prerequisites
- VOGO Voice account: https://www.vogovoice.com/
- Access rights to the Interaction builder platform.
How to access the ‘Loop’ component
Navigate to the interaction builder platform of VOGO Voice to access the Loop under the Components section. Click and drag the component onto the flow canvas.
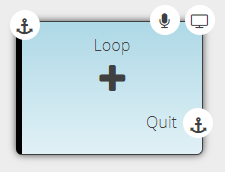
Click the Voice Icon on the top right-hand side of the component card to list the data and to input concise and successively ordered responses within the given fields.
Purpose of ‘Loop’ Component
The Loop response card performs the task of going through a particular list of data several times within an active session of the skill to iterate over the records individually as a continuous series of responses.
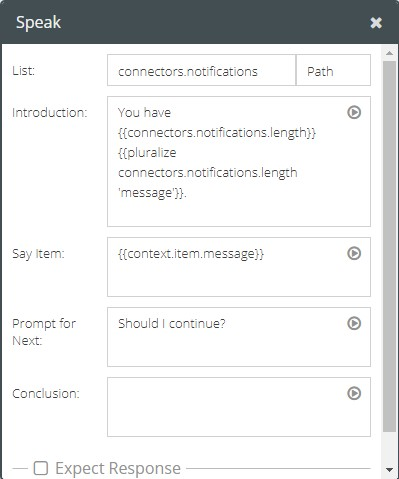
The Speak window of the Loop component displays several fields in which data information has to be inputted in select fields for the purpose of performing the core function of iterating a set of results to the user based on the amount of data returned.
To implement this loop within a custom skill, an array of results are to be referenced in order to start the repetitive process of prompting the result to its end-user. This PlaybackMode Intent is executed via a voice prompt of the retrieved data each time the user invokes ‘Yes’ to confirm his/her choice to hear the next response.
To set this loop to function, the starting point of this response card has to be directed towards the results of the connector query. Hence, the initial field titled List represents an array of results. To know more about data types, click here.
In the Introduction field, an introductory response is framed in accordance with the specific intent to which the queried data is tied to. It is at this phase of the response that it begins to loop through the results.
The next field titled Say Item captures the first item on the List that needs to be conveyed to the user. At this point, the loop speaks this part of the message as the voice response. If there are additional items in the list, the loop function seeks a confirmation from the user in the form of a ‘Yes’ or ‘No’ so as to determine whether or not to repeat the process of presenting to the user the next item in the list.
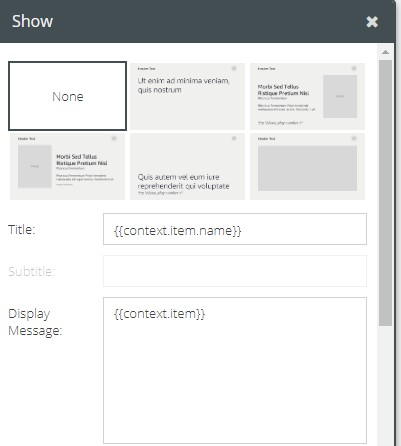
In the instance of running the loop function within a list of variables, the key values are retrieved from its respective fields using a specific syntax. Therefore, while looping through a list to retrieve data and to display them should start with the following template should be {{context.item}}
🖍 Note: When referencing any values from the list item, you will need to reference them using {{context.item.<key>}}. So, let’s say, you have a list of values that look like
[{ id: 1, name: "Jon"}, {id: 2, name: "Sam"}]
Then you would reference as {{context.item.name}} to display the names from the list of items given above. If for instance, you would want to display the id instead of the name, then the template would be {{context.item.id}}
Now, if you have a list of values without keys/arbitrary names similar to ["Apples", "Bananas", "Oranges"] then you would reference as {{context.item}} to display the value. To learn more about templates and how to use them, you could visit our guide on template engine and data types.
The cyclic process of the loop is set in motion based on the user’s choice to continue further with the interaction. To seek the user’s confirmation, a Prompt for Next is included in the response card. This field is made available to input custom questions such as ‘Should I continue?’, ‘Would you like to hear the next response?’ and so forth. If the user replies to the question in the affirmative, it will convey the next item on the list and each time an item is conveyed to the user it will be immediately followed by a Prompt for Next. This repetitive process goes on until the user chooses to discontinue the iterations or until all the items in the list have been presented to the user. The terminating condition of this cyclic process comes into effect the exact moment the user invokes ‘No’.
Before an active session of a skill ends, it is optional to include a note of courtesy in the Conclusion field such as Thank you!, Have a nice day! etc
If the session is intended to be prolonged, then the Expect Response field needs to be populated. The inclusion of an expecting response keeps the session open for further interaction. Prompt and Reprompt are the two types of Expect Response. To know about Expect Response, visit https://university.vogovoice.com/kb/guide-response-component/