In this in-depth tutorial, you will learn how to retrieve data from an array in select scenarios. The comprehensive instructions combined with highlighted screenshots will offer the required direction needed to follow with ease the task of retrieving data both from an array and an array of objects. This tutorial particularly focuses on arrays because they are especially useful when creating ordered collections where items in the collection can be accessed by the numerical position in the list.
Prerequisites
- VOGO Voice account: https://www.vogovoice.com/
- Access rights to the Interactions section.
- Access rights to the Interaction builder platform.
Create a Custom Intent
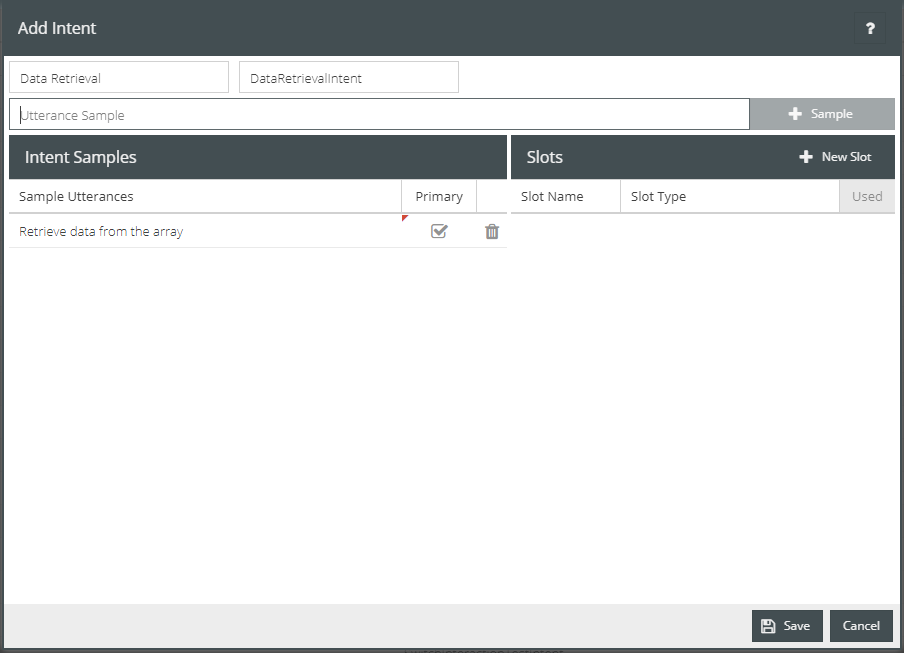
Make a suitable intent to be invoked in order to execute a data retrieval interaction mapped to it. Create an intent titled ‘Data Retrieval’ with a suitable sample utterance mapped to it. The sample utterance for this intent would be: “Retrieve data from the array”.
To learn about how to create a custom intent, visit Creating Intents
Steps to create an interaction flow
- Log into your VOGO Voice account to be directed to VOGO Voice Management Console (https://account.vogovoice.com)
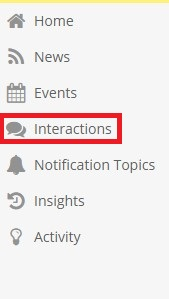
- Navigate to Interactions on the vertical bar displayed on the left-hand side of the Dashboard.
Dashboard > Interactions
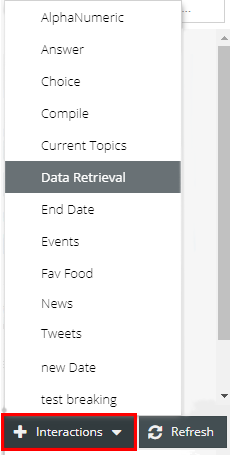
3. Now, click on the Interactions button at the bottom right-hand corner of the screen. Select the ‘Data Retrieval’ intent to be directed onto the Interaction builder platform.
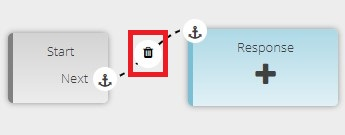
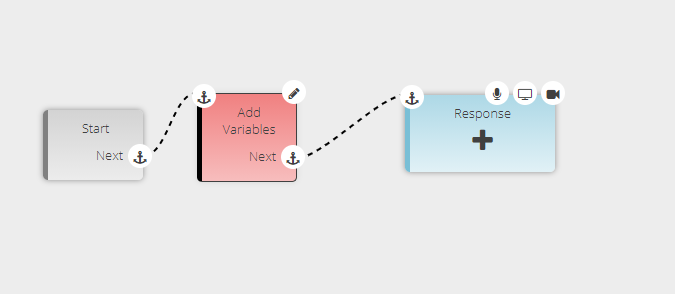
4. In the flow diagram area, you will be able to see the Start and Response components.
5. Unlink the Start component from the Response card by clicking the delete icon placed in the middle of the chain.
6. Drag and drop the Add Variables component onto the flow diagram area.
7. Connect the anchor symbol of Next on the Start component to the anchor symbol on the Add Variables component. Next, connect the anchor symbol of Next on the Add Variables component to the anchor symbol on the Response component.
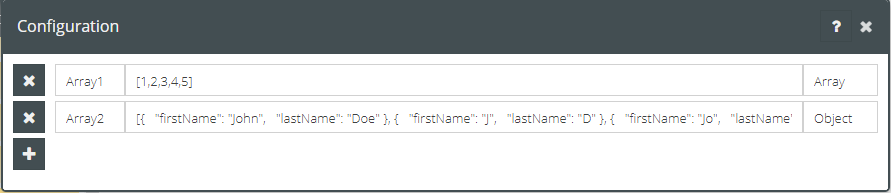
8. Now, configure the Add Variables component by adding the key-value pairs as shown in the screenshot below. Fill in the first variable name as Array1 and add the value as [1,2,3,4,5]. Set the datatype as Array. The second variable name can be given as Array 2 for which the value is an array of objects
[{ "firstName": "John", "lastName": "Doe" }, { "firstName": "J", "lastName": "D" }, { "firstName": "Jo", "lastName": "D" }]. In this case, assign the datatype as Object.
Now here are select scenarios and templates to fetch Objects/Elements.
Scenario 1: To retrieve items from an array
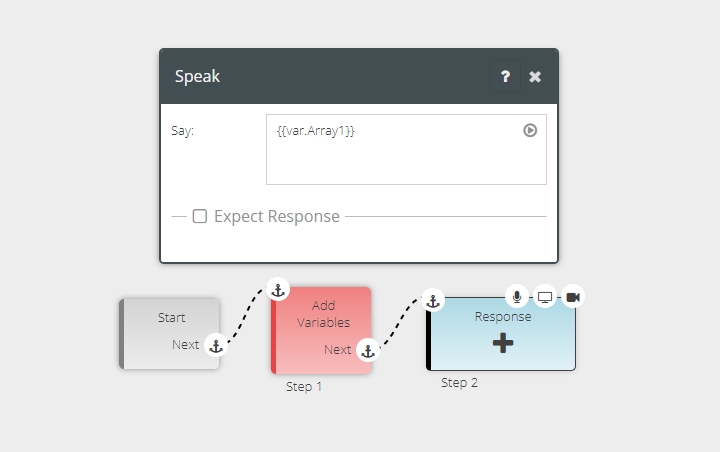
- To retrieve items from an array use the template {{var.Array1}} in the field titled Say of the Response component. As Array1 represents a simple array of values there is no need for array notations. Just the array name is enough in the field titled Say or Display message part of the Response Component to display all the elements in that array.
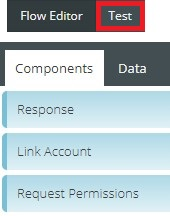
2. Next, click on the Test button next to the Flow Editor button on the interaction builder platform.
3. In the Tests pop-up window that appears click the + button on its top right-hand corner.

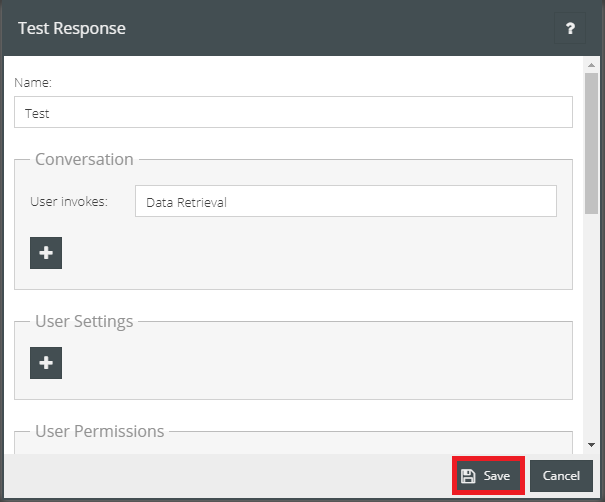
4. Fill in the Name field of the Test Response window that shows up. In the Conversation section of the Test Response, the Data Retrieval intent through which this interaction flow has been initiated will be auto-generated in the User invokes field as shown below. Now, click Save to perform the test.
5. To validate the Test Response, click on the lightning symbol on the left-hand side of the test case.

6. On the resultant Test Response window, the blue chat bubble will present all the elements retrieved from Array1 based on previously input Template within the Response component i.e. Result: 1,2,3,4,5

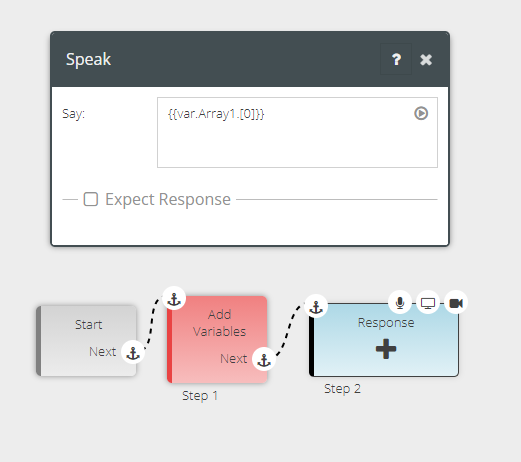
Scenario 2: To retrieve a specific item in an array
To retrieve a specific item from an array make use of the template {{var.Array1.[0]}} in the field titled Say or Display message part of the Response Component. Here [0] notation is made use of to show the position of the first element of the array.
👍 Note: To try out the different scenarios with variants of template, make use of the same interaction created at the start of the tutorial. Similarly, make use of the test response already created to perform the multiple tests.
2. To validate the Test Response, click on the lightning symbol on the left-hand side of the test case already created.
3. On the resultant Test Response window, the blue chat bubble will present the first item in Array1 which is 1. Result is 1. To access the second item use [1] notation, and likewise to continue.

👍 Note: Always use a dot before array notation. Otherwise, the template will not render it properly. Eg: {{var.Array1.[0]}}
💡 Tip: To pass or navigate a value out of an object through handlebars, always use array notation.
Scenario 3: To retrieve all items in an array of objects
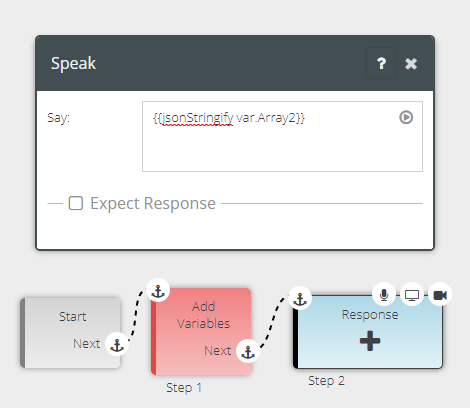
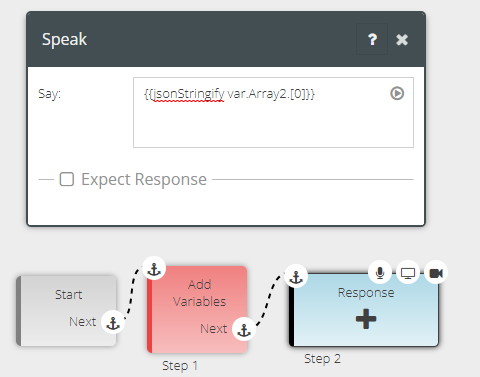
- To retrieve all items in an array use the template {{jsonStringify var.Array2}} in the field titled Say or Display messagepart of the Response Component.
a) Why do we use jsonStringify?
🖍 Note: To render a variable or a data within the Response component in our platform, it is converted into a human-readable format. This is applicable to Say or Display an object or a collection of objects. If we do not implement the jsonStringify function, the platform will convert it into an incomprehensible format and render it as [object Object]. Making use of jsonStringify renders it back to a human-readable string.
💡 Tip: As Array2 is an array of objects there is no need to use array notation to retrieve all the objects in that array together.
2. To validate the Test Response, click on the lightning symbol on the left-hand side of the test case already created.
3. On the resultant Test Response window, the blue chat bubble will present the Result: [{ "firstName": "John", "lastName": "Doe" }, { "firstName": "J", "lastName": "D" }, { "firstName": "Jo", "lastName": "D" }]
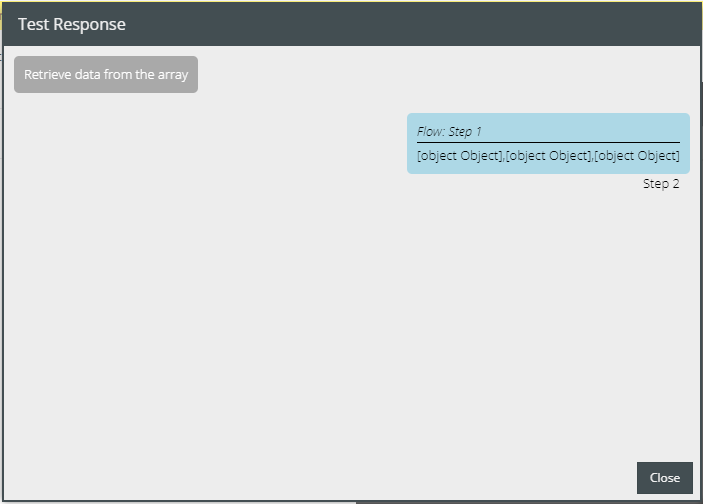
b) Now here is a contrasting scenario, when jsonStringify is not made use of along with the template in the Response component. The input template in this instance would be {{var.Array2}}
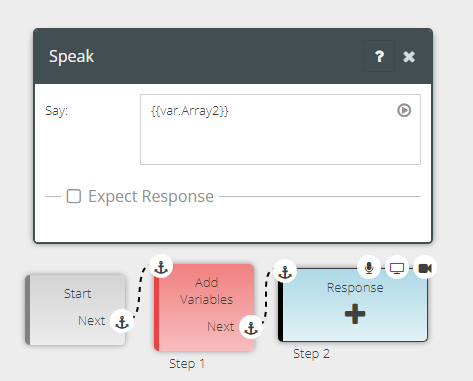
So, here’s the output without the jsonStringify function: The Result would reflect as [object Object], [object Object], [object Object] in the blue chat bubble of the Test Response window.
Scenario 4: To retrieve a specific object from an array
- To retrieve a specific object from an array use the template {{jsonStringify var.Array2.[0]}} in the field titled Say or Display message part of the Response Component.
2. To validate the Test Response, click on the lightning symbol on the left-hand side of the test case already created.
3. On the resultant Test Response window, the blue chat bubble will present the Result: { "firstName": "John", "lastName": "Doe" }
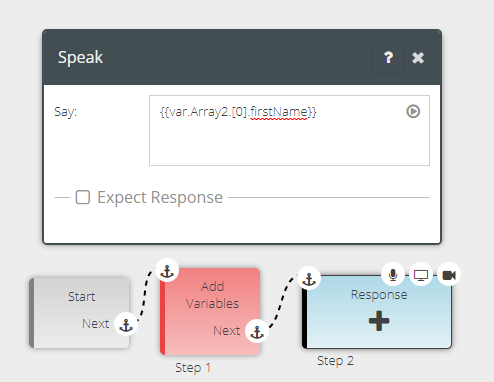
Scenario 5: To retrieve a specific value from an object of an array
- To retrieve a specific value from an object in an array use the template {{var.Array2.[0].firstName}} in the field titled Say or Display message part of the Response Component. Since we are not retrieving any object or collection of objects there is no need to use the jsonStringify function. The purpose here is to retrieve the first name from the first object of the array. To fulfill this purpose, use the array name, notation, and key firstName in the template to retrieve its value which is John.
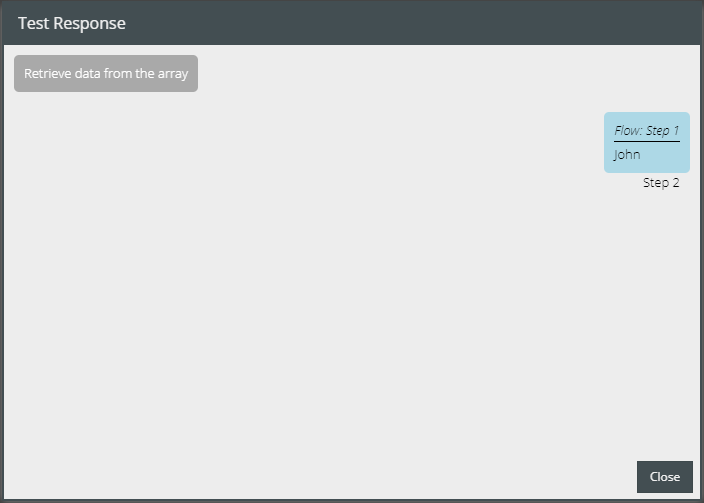
2. To validate the Test Response, click on the lightning symbol on the left-hand side of the test case already created.
3. On the resultant Test Response window, the blue chat bubble will present the Result: John
Congratulations! You have successfully learned how to apply the required template engine and wherever necessary input the jsonStringify function in the VOGO Voice interaction builder platform to retrieve data from an array in multiple scenarios each suited to its specific requirements.
👍 Note: To test the functioning of the interactions on your device you have to deploy the custom skill to facilitate the skill with the new edits. To accomplish this, click on the Deploy button seen at the bottom of the Skill Settings pop-up window.
To know how to deploy a custom skill visit https://university.vogovoice.com/kb/deploying-a-skill/
To learn about Add Variables, click here.